> ## Documentation Index
> Fetch the complete documentation index at: https://docs.firmhouse.com/llms.txt
> Use this file to discover all available pages before exploring further.
# Quick install Firmhouse on Shopify
> Step-by-step quick install guide for integrating Firmhouse with your Shopify store, including app install, configuration, and first-subscription setup.
All the steps you need to follow to integrate Firmhouse with your Shopify store.
This guide explains all the steps that you as a merchant (in combination with your agency/developer) need to do, to get started with selling subscriptions via Shopify Native Checkout powered by Firmhouse.
## Prerequisites
Before you begin, make sure you have:
* A Shopify store (could still be under development)
Let's get started with installing the Firmhouse App in your Shopify store!
## Step 1: Install the Firmhouse App in Your Shopify Store
1. Ensure you're logged into your Shopify store
2. Go to the [Firmhouse app on the Shopify app store](https://apps.shopify.com/firmhouse-recurring-commerce) and click **Install**
3. Verify and confirm the installation of the Firmhouse app on your store. Once installed, you will end up in the Firmhouse Portal, and you can continue with the next steps
In your Firmhouse project, you have a Getting Started menu with a video guide. The guide follows the same steps as this article, so you can also follow the video if that format works better for you.
## Step 2: Sync Your Products from Shopify to Firmhouse
You control which products and variants you want to offer for subscription. To sync your catalog, simply tag your products in Shopify:
* Tag subscription products with **`FIRMHOUSE_SUBSCRIPTION`**
* If you also want to offer one-time subscription add-ons in the Firmhouse Self Service Center, tag these products with **`FIRMHOUSE_ONE_TIME`**
When tagged, your products will automatically show up in the Products tab of the Firmhouse portal.
## Step 3: Create Your Subscription Plans in Firmhouse
In Firmhouse, go to **Plans** from the sidebar. Here, you can set up different **shipping frequencies** for your subscribers - for example, "Every 2 weeks" or "Every 2 months." These plans will appear as subscription options on the product page.
You can also set a **discount percentage** for each plan. This percentage determines the final product price for customers who subscribe to it.
If you want to offer the same selling plans for all your subscription products, you may create your plans in the Ungrouped plans section.
However, if you want to have specific plans apply to specific products (collections), we advise you to create **Selling plan groups** first, and then create plans for each group. For more details, see [How to work with selling plans and selling plan groups](/shopify/selling-plans-and-groups).
Once your plans are created, they will automatically sync to your Shopify store. Note that it may take a few seconds before the changes appear in Shopify.
You can then proceed with adding the "Add subscription to cart" interface on your product detail pages.
## Step 4: Add or Build Subscription Options on Your Product Detail Pages
Now it's time to add the subscription options to your product detail pages, so your customers can add them to their cart. There are two ways to do this:
1. Use one of the standard Firmhouse Subscription Options widgets (for Shopify 2.0 supported themes)
2. Build or modify your existing custom subscription widget
### Option 4.1: Add the standard Firmhouse Subscription Options widget (recommended)
1. In the Shopify theme editor, select the Product template page you want to edit. For example: **Products > Default product**
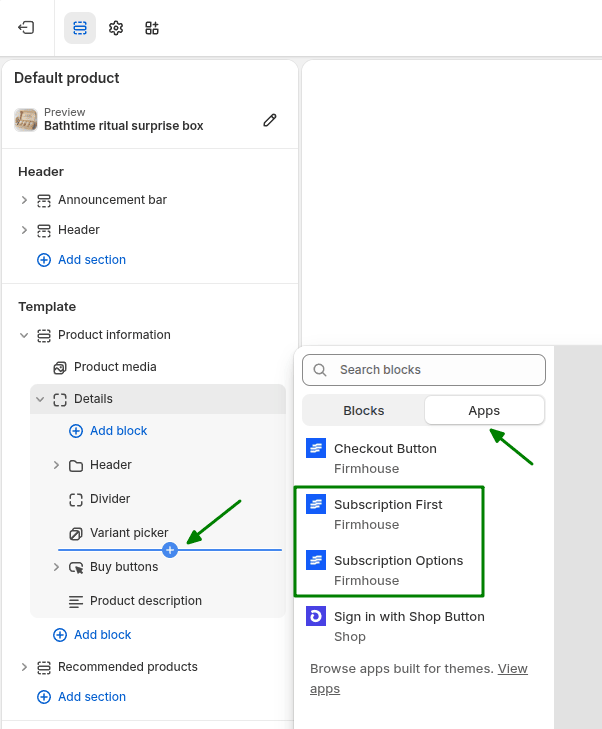
2. In the sidebar under **Template** in the **Product information**, click **Add block**
3. Switch to the **Apps** tab in the **Add block** section and click **Subscription Options** or **Subscription First** widgets
4. If you want, customize your widget to match your branding
 ### Option 4.2: Build a custom subscription widget
If you have specific wishes for your subscription widget that the Firmhouse standard widget does not cover, you can also build your own. See [Build or modify your existing custom subscription widget](/configure/shopify/custom-subscription-widget) for detailed instructions.
## Step 5: Verify Your Payment Methods
By default, Credit Card (via Shopify Payments, Adyen, or Stripe) and PayPal will work with Shopify Subscriptions out of the box if they are enabled in your store. Other payment service providers do not support credit card payments for recurring subscriptions on Shopify—see [Supported Payment Methods](/explained/supported-payment-methods) for more details.
If you're setting up a new store, enable these payment methods in your Shopify admin:
1. Go to **Settings > Payments** in your Shopify admin
2. Set up **Shopify Payments** (or connect **Stripe** or **Adyen** as your credit card provider)
3. Enable **PayPal** by connecting your PayPal account
In most existing stores, these payment methods will already be configured and ready to use for subscriptions.
### 5.1: Enable local payment methods for Europe
If you want to offer local payment methods like iDEAL | Wero, Bancontact, and SEPA Direct Debit, continue with the [Set up iDEAL | Wero, SEPA and other local payment methods](https://docs.firmhouse.com/shopify/setup-local-payment-methods) guide.
## Step 6: Test your first subscription checkout
We strongly advise creating at least one test subscription to verify that the connection with Firmhouse works as expected, and recurring payments are processed by the PSP.
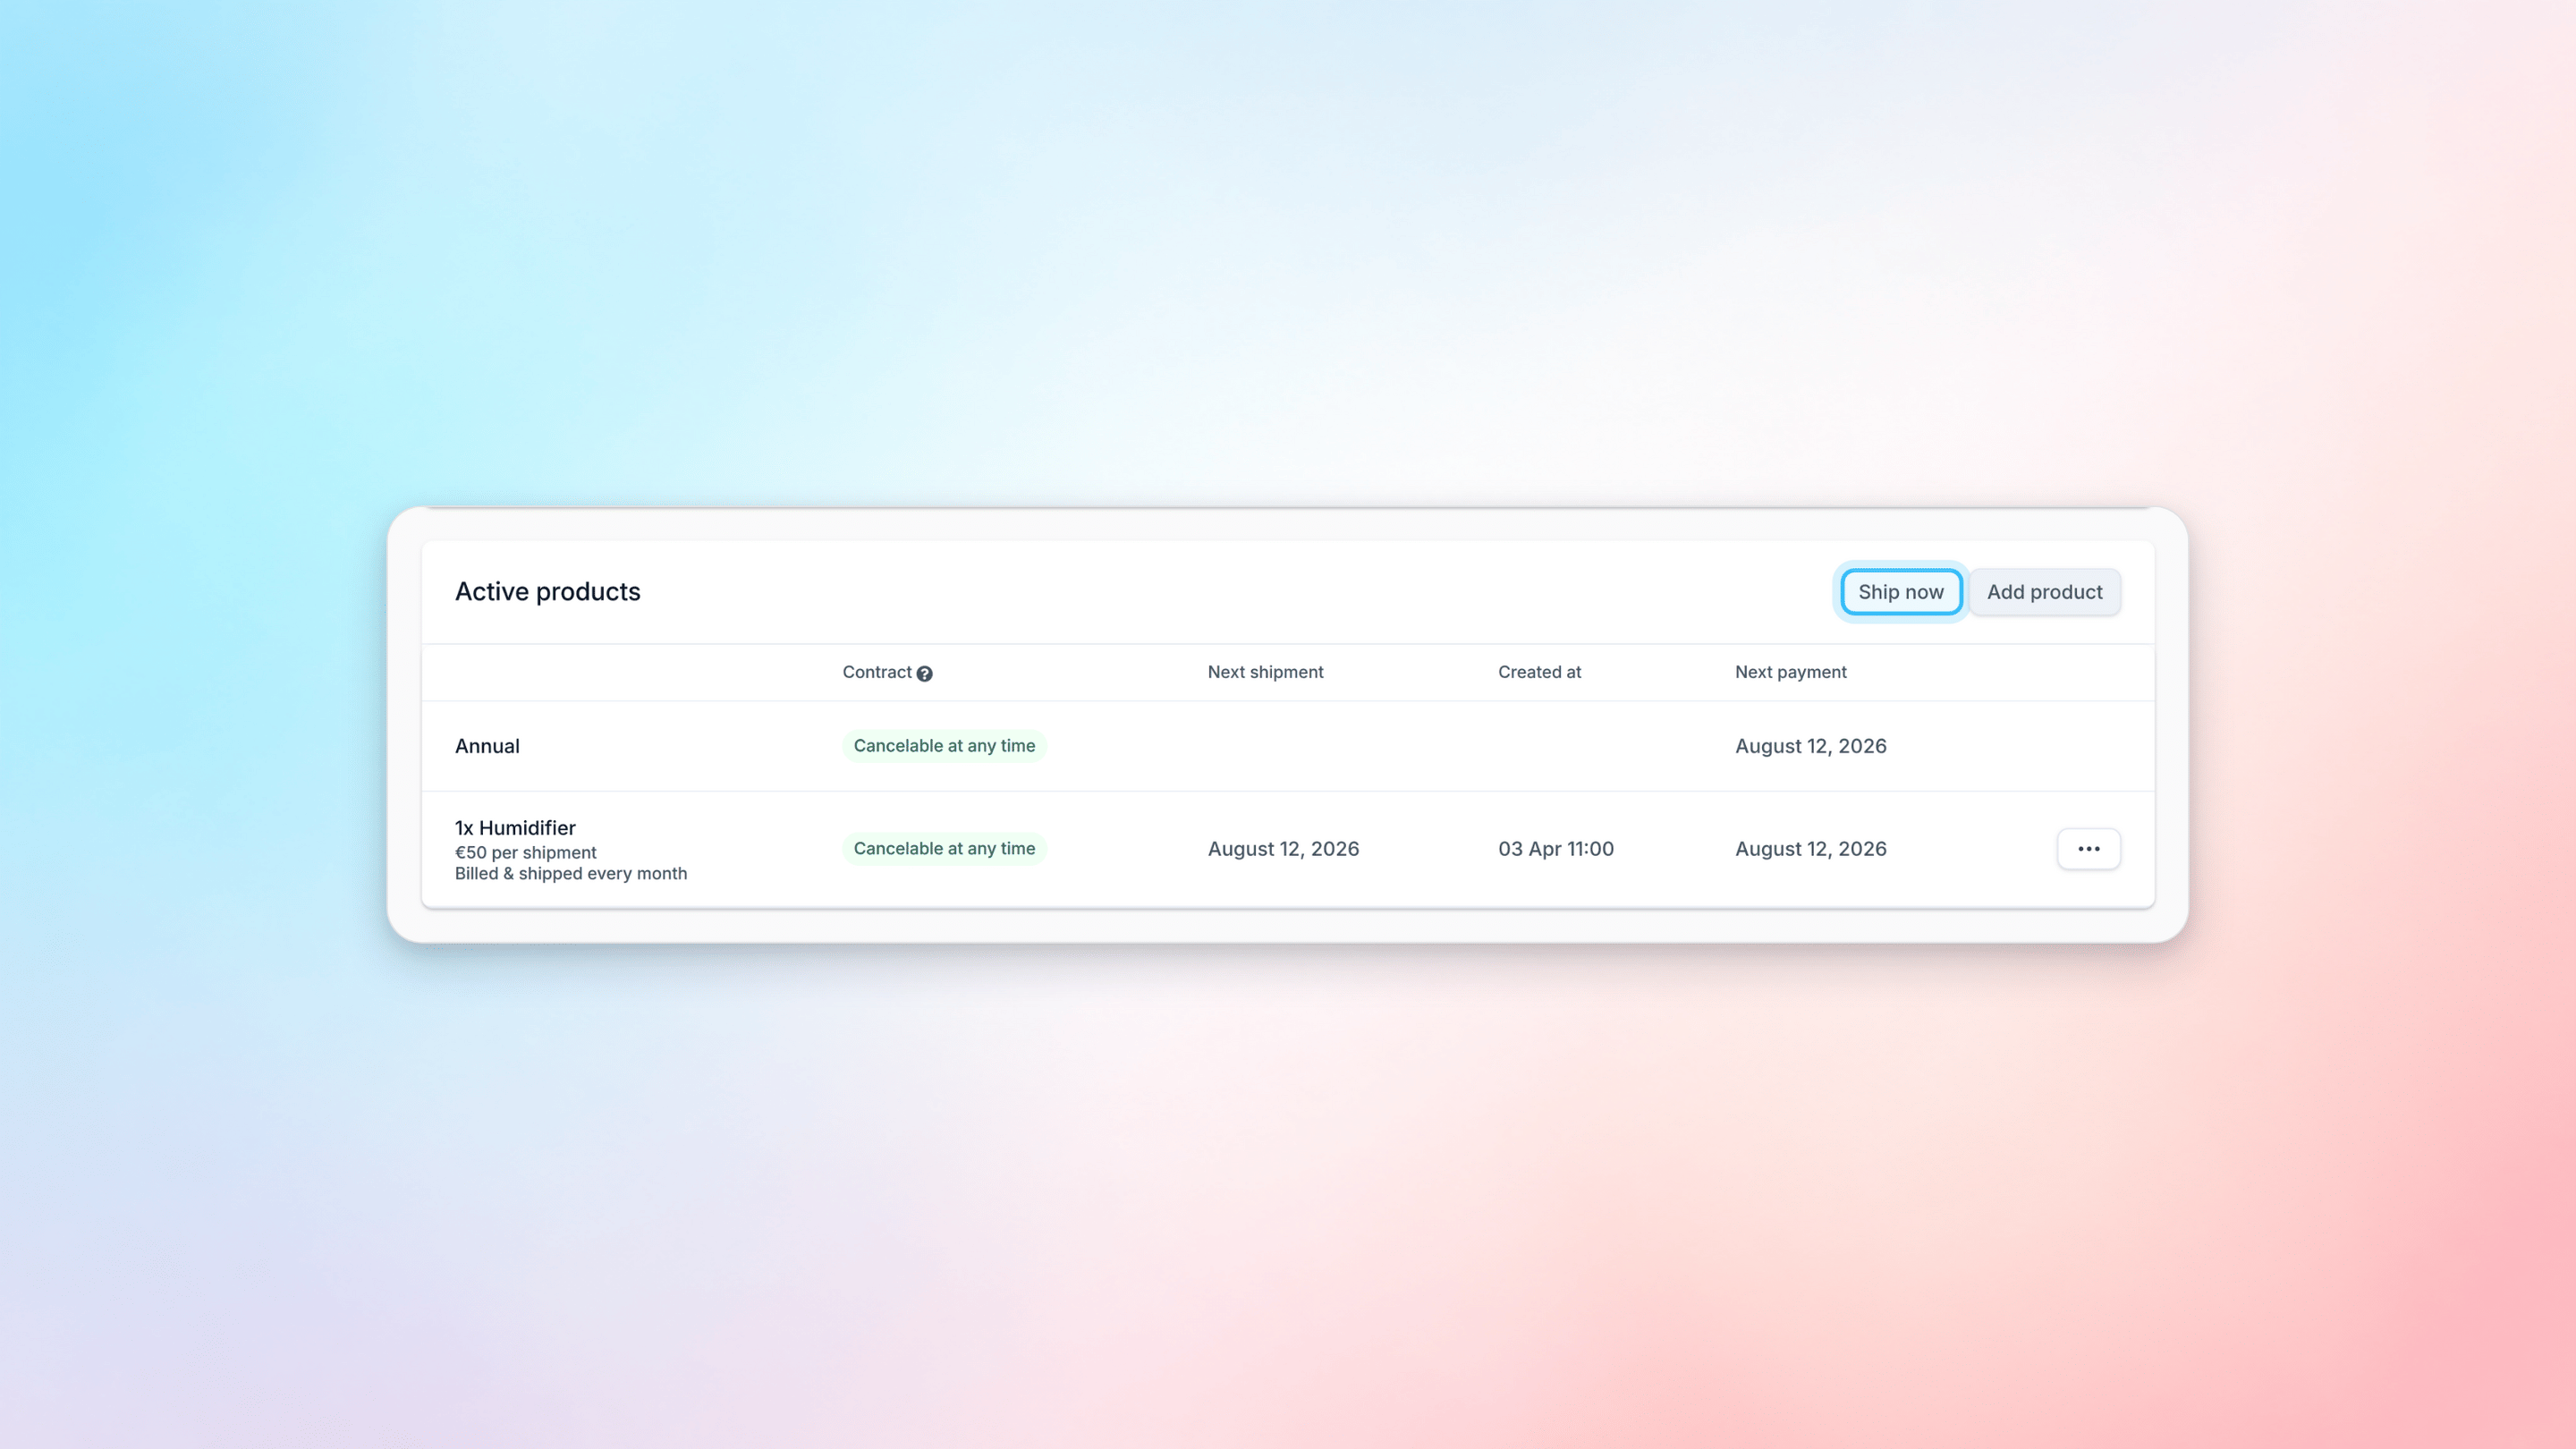
After the initial payment, go to the **Subscriptions** page and open the new subscription. Scroll down to the **Active products** section and click **Ship now** to trigger a recurring order. If the payment succeeds, you're all set!
### Option 4.2: Build a custom subscription widget
If you have specific wishes for your subscription widget that the Firmhouse standard widget does not cover, you can also build your own. See [Build or modify your existing custom subscription widget](/configure/shopify/custom-subscription-widget) for detailed instructions.
## Step 5: Verify Your Payment Methods
By default, Credit Card (via Shopify Payments, Adyen, or Stripe) and PayPal will work with Shopify Subscriptions out of the box if they are enabled in your store. Other payment service providers do not support credit card payments for recurring subscriptions on Shopify—see [Supported Payment Methods](/explained/supported-payment-methods) for more details.
If you're setting up a new store, enable these payment methods in your Shopify admin:
1. Go to **Settings > Payments** in your Shopify admin
2. Set up **Shopify Payments** (or connect **Stripe** or **Adyen** as your credit card provider)
3. Enable **PayPal** by connecting your PayPal account
In most existing stores, these payment methods will already be configured and ready to use for subscriptions.
### 5.1: Enable local payment methods for Europe
If you want to offer local payment methods like iDEAL | Wero, Bancontact, and SEPA Direct Debit, continue with the [Set up iDEAL | Wero, SEPA and other local payment methods](https://docs.firmhouse.com/shopify/setup-local-payment-methods) guide.
## Step 6: Test your first subscription checkout
We strongly advise creating at least one test subscription to verify that the connection with Firmhouse works as expected, and recurring payments are processed by the PSP.
After the initial payment, go to the **Subscriptions** page and open the new subscription. Scroll down to the **Active products** section and click **Ship now** to trigger a recurring order. If the payment succeeds, you're all set!
 Remember to refund the test payments and cancel the subscription.
## Done!
Explore more ways to use Firmhouse:
* [**Compatible Shopify plugins**](https://docs.firmhouse.com/explained/compatible-shopify-plugins#compatible-shopify-plugins)
* [**View customer subscription details**](https://docs.firmhouse.com/manage/subscriptions/viewing-customer-details)
* [Configure shipping costs](https://docs.firmhouse.com/configure/shopify-shipping-rates)
* [Set up discounts in Shopify](https://docs.firmhouse.com/configure/discounts/discounts-on-shopify-checkout)
Remember to refund the test payments and cancel the subscription.
## Done!
Explore more ways to use Firmhouse:
* [**Compatible Shopify plugins**](https://docs.firmhouse.com/explained/compatible-shopify-plugins#compatible-shopify-plugins)
* [**View customer subscription details**](https://docs.firmhouse.com/manage/subscriptions/viewing-customer-details)
* [Configure shipping costs](https://docs.firmhouse.com/configure/shopify-shipping-rates)
* [Set up discounts in Shopify](https://docs.firmhouse.com/configure/discounts/discounts-on-shopify-checkout)